Step by Step tying guides plus other contributions from branch members.
Superb clarity images with easy to follow INSTRUCTIONS and essential tying tips. As well as some recollections of fishing trips.
- The Peacock Eye Diawl Bach – A Fly for May – Les Lockey April 2024
- Report for the River Alyn, 7th March 2024
- The Twisted F.A.B (Foam Assisted Blob)- A Fly for April – Les Lockey March 2024
- The Ephemeroptera Patterns – Les Lockey 20/02/2024
- The Split Cormorant – A Fly for November – Les Lockey October 2023
- The Mohican – A Fly for October – Les Lockey, September 2023.
- The Foam Daddy – A Fly for September – Les Lockey, August 2023.
- The Threadless Green Diawl Bach – A Fly for August – Les Lockey, July 2023.
- The Elastic Caddis Pupa – A Fly for July – Les Lockey, June 2023.
- The Quill Cormorant – A Fly for June – Les Lockey, May 2023.
- The foam bodied Hawthorn – A Fly for May – Les Lockey, April 2023.
- The Kate McLaren – A Fly for April – Les Lockey, March 2023.
- The Copper Cruncher – A Fly for November – Les Lockey, October 2022.
- Lake Vyrnwy in August 2022 – Eddie Wilkinson, September 2022.
- The Rabbit Perch Fry – A Fly for October – Les Lockey, September 2022.
- The App’s Bloodworm (Fluorescent Pink) – A Fly for September – Les Lockey, August 2022.
- A Week at Coldingham Loch – Mike Warburton, July 2022.
- The Black Foam Beetle (Dry) – A Fly for August – Les Lockey, July 2022.
- At Last – The Return to Lake Vyrnwy – Eddie Wilkinson, June 2022.
- The Damselfly Nymph – A Fly for July – Les Lockey, June 2022.
- The Yellow Owl (Emerger) – A Fly for June – Les Lockey, May 2022.
- The Summer Bibio (Dry) – A Fly for May – Les Lockey, April 2022.
- Dennis the Menace Midge Pupa – A Fly for April- Les Lockey, March 2022.
- Tying an Olive Parachute – a video by Carl.
- A Privileged Happening – Mike Warburton – Aug. 2016.
- Some more tips from one of our members – Ni Rogers, Aug 2016.
- A Trip To Brenig – Eddie Wilkinson – July 2016.
- The ‘Z-Knot’ is probably the strongest fly fishing knot – Chris Watson, July 2016.
- Casting for Recovery at Coniston Hotel and Country Estate – Mike Warburton.
- A Day Trip to Blithfield Fishery, Staffs – Donald Couper, April 2016.
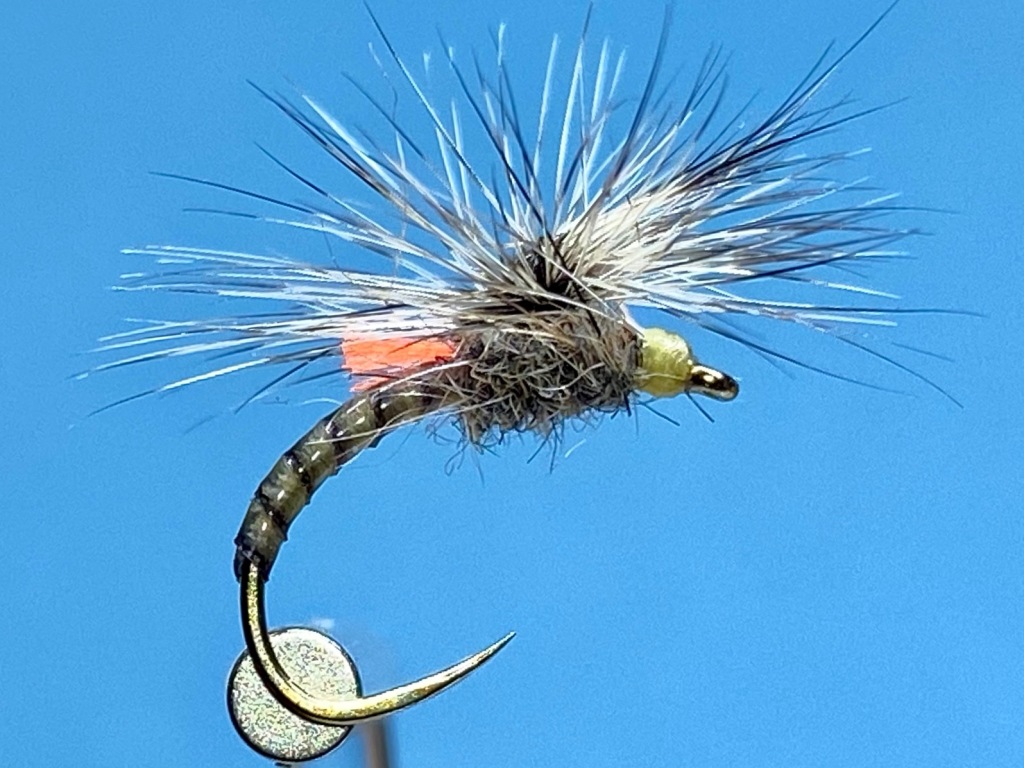
Peacock Eye Quill Diawl Bach- A Fly for May
Hook: Kamasan B110, heavy grub hook, size 10 to 14.
Thread: Roman Moser Power Silk, 10/0, in olive, or any flat olive thread.
Tail: Partridge hackle fibres dyed yellow.
Body: Peacock eye herl quill dyed fluorescent yellow.
Beard hackle: Partridge hackle fibres dyed yellow.
Cheeks: Split jungle cock nail feather.
Head: Fox squirrel or hare’s ear fur, dubbed.

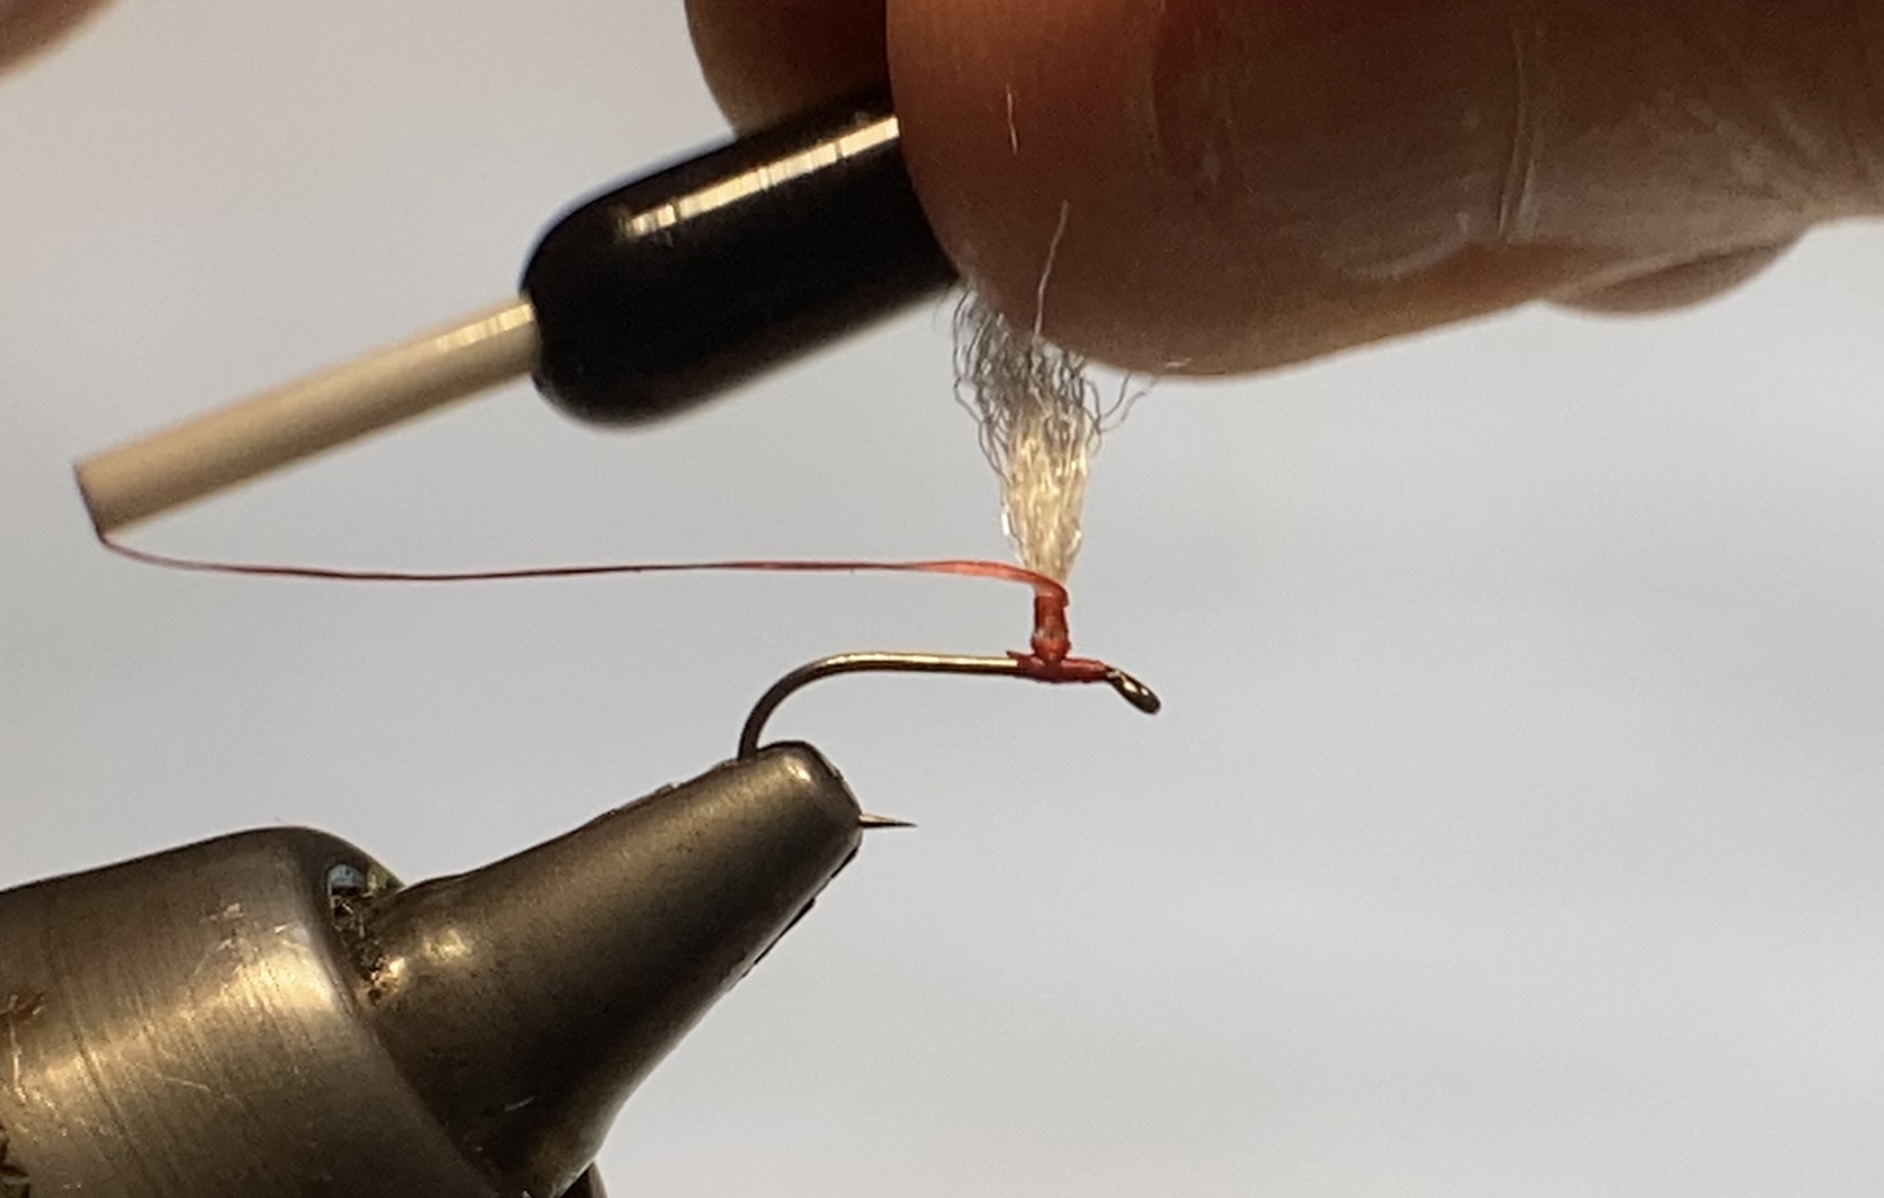
Photo 1. With the hook secured in the vice, catch on the thread behind the eye and wind on a smooth bed of thread round the bend to just past the barb and remove the waste thread.
Photo 2. Align the tips of a small bunch of partridge hackle fibres, remove them from the feather and tie them in on top of the shank as a tail with two turns of thread, leaving the waste ends the same length as the body. From the eye section of a peacock eye feather, remove one eye herl quill and tie it onto the shank by the thin end and with the dark flue section at the bottom. Bind the tag endsdown with touching thread turns stopping about 3mm. from the eye and remove the waste quill tip.


Photo 3. Carefully add a light coating of superglue to the thread underbody, and then wind the quill in almost touching turns up the shank to about 3mm. from the eye. Secure the quill with a few turns of thread, remove the excess quill and allow the glue to dry before continuing.
Photo 4. As for the tail, align the tips of a small bunch of partridge hackle fibres, remove them from the feather and tie them in under the shank as a beard hackle, about the same length as the tail, then carefully cut away the waste ends.


Photo 5. Tie in a split jungle cock eye so it sits equally on either side of the body and remove the waste feather.
Photo 6. Dub a small pinch of fox squirrel fur onto the thread and wind on the dubbing noodle to form a small thorax. Add some varnish to the thread, whip finish through it and remove the thread to complete the fly.


Tying Tips
- A flat tying thread helps to produce a nice smooth underbody on which to wind the peacock eye herl quill.
- Peacock eye feathers come in a wide range of dyed colours with orange, olive, claret, and black being very useful alternatives.
- Unlike most peacock eye quill patterns, the herl quills used here are not stripped and are used straight from the peacock eye feather, with the best herl quills coming from those quills that pass directly through the eye part of the feather. On these quills, the flue is quite short and aligned along just one edge, which makes them ideal for creating the segmented body. It is worth noting that the longest quills come from the largest eyes, which not only allows easier manipulation, but it also means larger hook sizes can be used.
- Be careful when using superglue. A light coating is all that is needed, and always allow the glue to dry before continuing to complete the fly.
- When winding the quill, instead of using fingers, or hackle pliers, I use a lightweight plastic electrical clip. This allows the quill to be held by the very end which maximises the useful part of the quill, prevents damage to the herl and gives greater feel when winding the quill.
- If jungle cock nail feathers are not available, try using fluorescent yellow or chartreuse goose biots, or for a more natural look similar to that of jungle cock, try caramel coloured biots from Flybox.
Les Lockey – April ’24
Report for the River Alyn, 7th March 2024
5 Grayling caught. Fished 13:45 to 15:00 All on the Pink Wasp which worked well in the coloured water. Fished Worms Wood (after Tom) and had just over the hour fishing. All the Grayling were of a good size, best 1 1/2lb, others about 3/4lb. Forgot to take the camera, but did have my Head Cam !
I did find out I had a leak in my waders – the crutch area, the water is COLD.!!! YouTube clip can be seen here: youtu.be/l2f1LnTynPw
The Pink Wasp.
You may need “Shades”. Those who came to the tying nights will have seen the “Luminous” material – it is bright !

Hook – Kamasan B110 grubber size 10
Bead – UV glass bead in Pink
Underbody – Fine Lead Wire
Tag – Lureflash “Luminous” strip in orange
Body – UV Pink straggle string
Shellback – Mirage Pear Tinsel (Large)
Rib – Fine gold wire and Lureflash “Luminous” strip in orange, the remaining strip was folded back in loops (2 sets + 1 single) Loops cut to produce legs / wings.
Eddie Wilkinson – March ’24
The Twisted F.A.B (Foam Assisted Blob)- A Fly for April
Hook: Kamasan B160, short shank hook, size 8 or 10.
Thread: Black Veevus GSP, 50D.
Tail: 5 or 6mm. diameter, black foam cylinder,
Body: Any fine cored Fritz in black and fl. green, such as, Definite Advantage 15mm. translucent Fritz from Dave Downie at flyfishingworld.com or FNF 10mm. Jelly Fritz from fnflyfishing.co.uk

Photo 1. With the hook secured in the vice, wind on a bed of thread from the eye to a point opposite the barb and remove the waste thread. Prepare the foam by taking a 5 or 6 mm. black cylinder and cutting it in half. Take one of the halves and cut it in half along its long axis, producing two useable foam “tails”.
Photo 2. Lightly smear some superglue along the thread base, position one of the foam “tails” flat side down on top of the shank with the tail section proud of the hook bend. Press the foam against the shank and secure in position with the thread. Continue to bind down the foam to form as even an underbody as possible and return the thread to the barb.


Photo 3. Take a 12cm.length of both black and fl.green Fritz and strip away the flue from one end of each length to expose the cores. Tie in the cores flush against the foam “tail” and bind them down with thread, leaving the thread at the eye.
Photo 4. Twist the two lengths of Fritz together to form a twisted Fritz rope, occasionally pulling the strands away from each other to tighten the twists and push them closer to the shank.


Photo 5. Keeping hold of the twisted Fritz, wind the twisted Fritz rope up the shank to just before the eye. Hold the Fritz body in position and allow the remaining Fritz to untwist, then secure the Fritz with a couple of tight turns of thread and bring the thread to immediately behind the hook eye.
Photo 6. Once secured, gently pull the two strands rearward. At the same time, wind the thread back from the eye to lock the two lengths of Fritz in position, creating a neat head in the process. Carefully remove the excess fritz with a sharp blade.


Photo 7. Whip finish, remove the thread and varnish the head and if required, trim the foam “tail” to length to complete the fly.
Tying Tips
- FABs and blobs tend to polarise fly fishing opinion. However, the FAB has been instrumental in the development of the highly effective washing line technique and in so doing, has actually popularised the use of more traditional nymphal patterns, so for this reason as well as its rather unusual tying method, which quite literally has a bit of a twist, I feel its inclusion here is justified.
- A flat tying thread helps to tie down the foam and even out the bumps, but when tying down the Fritz at the head, spin the bobbin clockwise to tighten the thread into a thin and tight rope which makes for a more compact tie in point and a neater head.
- Add a small drop of superglue to the thread base before firmly securing the foam with thread. This will prevent the foam from sliding around the hook shank and provide a solid foundation on which to wind the fritz. Some tiers cut the foam “tail” centrally to increase its surface area, which supposedly increases the fly’s buoyancy, but I have never found this to be necessary.
- If foam cylinders are not available, simply cut a 5mm wide strip of 2mm thick black craft foam, double it over the hook bend to form a foam loop “tail” and with the foam running down either side of the shank, bind it down securely with thread.
- While the weight of the hook and the amount of foam used would seem to dictate the buoyancy of the fly, it is important to realise that when fishing the washing line, over and above the buoyancy of the FAB, the type of leader material used, length of leader, distribution of droppers on the leader, the weight of the dropper flies, and the prevailing weather conditions, will all have an impact on the depth at which the flies will fish, so it is worth tying up FABs with differing amounts of foam so you can adjust the buoyancy of the set up as required.
- There are literally dozens of different kinds of Fritz on the market today and in a vast array of colours, including a few dual coloured options, but these are largely limited to mixes of yellow, green, orange, and pink, however by using fine cored, unboosted Fritz, the variety of different colour combinations is almost endless.
- When twisting the strands of Fritz together, remember to occasionally pull the strands away from each other. This tightens the twists, allowing the fibres to mix more evenly and it pushes the twists further up the core towards the shank. Approximately 10 cm. of twisted Fritz will be required, and it is surprising just how many twists that will take. Once the Fritz is twisted together, give it a gentle brush to ensure the fibres are well mixed and remember to keep hold of the twisted Fritz throughout the winding process to prevent the twists unravelling.
- A quicker and simpler way of twisting the Fritz together is to use the new dubbing twister from Smhaen of Denmark. This clever little tool is primarily concerned with making and controlling dubbing loops, but it can also be used to directly clamp and spin many different kinds of material, including Fritz.
- Once the Fritz body is wound along the shank, use your left thumb to hold the Fritz in position. The remaining Fritz can then be untwisted and secured with thread. It helps here to spin the bobbin clockwise to twist the flat thread into a fine round thread and wax it well before tying down the Fritz. Once secure, and with the thread taken to the eye, the untwisted strands of Fritz are gently pulled rearward while the thread is wound back from the eye. This locks the Fritz in place, pushes the front fibres rearward and forms a neat head all at the same time.
- Use a sharp blade such as a razor, scalpel, or craft knife, to cut away the Fritz.
- To change the fly from a FAB to an early season blob, simply omit the foam. Some tyers like to add a short tail of black or fluorescent green marabou.
- Instead of twisting the two lengths of Fritz together, another option, although tricky to do, is to wind the two lengths of Fritz simultaneously, which produces bands of colour rather than an integrated mix of colours.
Les Lockey – March ’24
The Ephemeroptera Patterns – Les Lockey 20/02/2024

The Foam and CDC Dun (Neil Sinclair)
Hook: Kamasan B170, sizes 12 – 14, or similar.
Thread: Olive UTC 70, or colour to match hatch.
Tail: Coq de Leon fibres.
Wing: 3 or 4 natural CDC feathers.
Body: 2x2mm. strip of brown foam.

The Timmy
Hook: Hayabusa FLY384 curved buzzer hook, sizes 8 to 16.
Thread: Semperfli Nanosilk, Brown, 30D, 18/0.
Tail: 3 Moose body hair fibres.
Abdomen: Fulling Mill Ultra Nymph Dub in Cowdung, or colour to match hatch.
Wing: Silver, black and khaki polypropylene macrame yarn, mixed to give a grey dun colour.
Thorax: As for abdomen.

The Caenis Dynamite Harry (Variant)
Hook: Guru MWG barbless carp hook, size 20.
Thread: Veevus GSP, white, 30D, 18/0.
Tail: White cock hackle fibres.
Body and Wing: White macrame polypropylene yarn or Tiemco Aero Dry Wing.
Thorax: Black superfine dubbing.
Hackle: Grizzle cock hackle, tied as a parachute.

The Olive Hopper
Hook: Fulling Mill FM50 65, Czech nymph hook, size 16.
Thread: Olive Roman Moser Power Silk, 10/0, or any fine olive flat thread.
Body: Dyed golden olive stripped peacock eye quill coated with UV resin.
Legs: Six knotted bronze mallard feather fibres.
Wing:Tips of 2 or 3 small CDC feathers.
Hackle: Olive grizzle cock hackle.
The Hacklestacker Olive Emerger or Midden Fly
Hook: Fulling Mill FM50 60, Bronze Czech Nymph hook, size 14.
Thread: Veevus 8/0, yellow, shade E09, or UNI 8/0, Lt. Cahill.
Rib: Semperfli Magic Quill.
Abdomen: Thread as above.
Hot Spot: Glo Brite floss no 5, hot orange.
Hackle: Genetic grizzle cock hackle tied paraloop style around its own stalk.
Thorax: Grey squirrel fur, dubbed.

Emerging Floating Olive Nymph
Hook: Kamasan B170, sizes 12 – 14.
Thread: Sheer 14/0, Dun.
Tail: Grey or Blue Dun cock hackle fibres.
Rib: Clear Buzzer Wrap, stretched.
Abdomen: Olive CDC feather.
Wing stub: White Aero Dry Wing.
Legs: Grey or Blue Dun cock hackle fibres, tied in as a V.
Thorax: Hare’s body fur & UV Lite Brite, mixed.
The Split Cormorant – A Fly for November
Hook: Competition Barbless, sizes 10 or 12, (from Flybox), or similar.
Thread: Black Semperfli Nanosilk, 50D, or any black 8/0 thread..
Body: 2 Strands peacock herl.
Rib: Fine silver wire.
Thorax Cover: Mirage tinsel, wide.
Wing: Black marabou.
Cheeks: Glo Brite Floss, No. 4, scarlet.

Photo 1. Leaving a long thread tag, wind on the thread at the eye and lay down a short bed of thread. Do not cut off the thread tag.
Photo 2. Tie in the silver wire followed by 2 strands of short fibred peacock herl leaving the waste ends the same length as the body. Continue to bind down the materials to a point just past the hook point and return the thread to the head.


Photo 3. Carefully twist the herl around the thread tag to form a herl rope. Once formed, wind the rope up the shank, tie it down at the head and remove the excess herl rope. Now bring the silver wire up the body in open spirals as a rib, tie down at the head and worry off the wire.
Photo 4. Tie in a length of Mirage tinsel squarely on top of the hook shank and bind it down to the eye.


Photo 5. Take a bunch of marabou fibres and strip away the flue from the basal ends to expose the bare stems. Trim the bare stems to length and tie them in securely as a wing with well waxed thread, then pinch the marabou wing to length.
Photo 6. Double a length of Glo-brite floss and tie it in as cheeks on each side of the body. Once secure, pull the ends of the floss tight and trim off the excess to create short floss stubs of about 2mm. in length on either side of the body.


Photo 7. Divide and separate the marabou wing into two equal bunches, bring the tinsel forward between the two bunches and tie it down tight at the eye and remove the excess tinsel.
Photo 8. Form a neat head, whip finish, remove the thread and varnish the head to complete the fly. Note – The final photo shows the wing damp to aid photography.


Tying Tips
- Keep the tag end of thread long as this helps when forming the herl rope.
- Peacock herl is particularly fragile near the tip, so always trim off the tips before tying in the herl.
- Twisting the herl around the tying thread to form a herl rope results in a dense and more durable body. Coating the thread underbody with a light smear of superglue prior to winding the herl rope will make the body even more robust, but let the glue dry before continuing with the tying.
- I find it easier to pinch the marabou to an approximate length before tying it in and to then strip away the flue from the basal ends with my finger and thumb nail to expose the bare stems which are then trimmed to length and tied in securely with well waxed thread. This reduces bulk and avoids cutting the marabou on the hook which helps to neaten the head.
- When dividing the marabou wing into 2 equal bunches, it helps to use moistened fingers to dampen the marabou and then use a dubbing needle to divide the fibres. This also makes it easier to tweak the marabou and the tinsel into the correct position.
- Make sure the tinsel is pulled tight before securing with thread at the eye. I make two light thread wraps to locate the tinsel, then while making a tighter third wrap, I gently pull on the tinsel and make a further tight thread wrap to lock the tinsel in place which ensures the tinsel remains flat between the bunches of marabou.
- Glo Brite floss in orange, yellow, chartreuse, and amber make good alternatives for the cheeks.
Les Lockey – Oct ’23
The Mohican – A Fly for October
Hook: Partridge Patriot Grub and Buzzer, or similar, size 8 or 10.
Thread: Pearl Fusion thread, (from Flybox) and black Semperfli Nanosilk, 50D.
Body: Pearl Fusion thread.
Rib: Pearl Fusion thread.
Thorax: UV red micro Straggle.
Wing: Natural Pine Squirrel zonker strip.

Photo 1.Secure the hook in the vice and starting about 2 mm. back from the eye, wind on a short bed of fusion thread and remove the waste.
Photo 2.Continue to wind the thread in touching turns to part way round the bend, then spin the bobbin holder clockwise to tighten the thread, and wind it back up the shank in open spirals as a rib, stopping at the thorax.


Photo 3.Tie in a length of red straggle and remove any waste.
Photo 4.Attach the black thread behind the eye and run it on to anchor the pearl thread, then remove the pearl thread. Now wind on a few turns of straggle to form the thorax, secure with thread and remove the waste straggle.


Photo 5.Cut a piece of zonker strip to about twice the length of the hook and trim away the fur from the head end. Using well waxed thread, tie in the zonker strip securely on top of the shank immediately in front of the thorax and cut away any excess skin.
Photo 6. Tidy the head with thread, whip finish and remove the thread. Varnish the head to complete the fly.


Tying Tips
- This is a very simple pattern to tie and several variations can be created simply by altering the colour of the materials. A black body and wing with a red or green thorax, or an olive body and wing with a chartreuse thorax are very effective alternative combinations.
- As the name suggests, Fusion thread is a combination of standard thread and fine metallic tinsel and as such, it speeds up the tying process, but standard thread along with tinsel bodies can also be used.
- The straggle thorax should be substantial enough to kick the squirrel wing upwards away from the hook allowing maximum movement in the wing.
- Pine squirrel micro zonker strips are used for the wing to maintain proportion in the fly and to provide maximum mobility. They can be bought either as pre-cut zonker strips, or as whole zonkered skins, which is my preferred option, but they are expensive to buy and are only available in natural, black, olive, chartreuse and orange. That said, it is one of my favourite fly tying materials. It makes great dubbing and is ideal for wings on mini lures and larger wet flies.
- Before tying in the zonker strip, I cut it to length and strip away some fur at the front end so the bare skin can be trimmed to fit neatly at the head. This avoids cutting the strip in situ and allows a small, neat head to be formed.
- Nanosilk GSP thread is arguably the strongest and thinnest thread on the market. Its use here allows the thread to be pull down really tightly onto the fur strip to produce a very robust fly.
Les Lockey – Sep ’23
The Foam Daddy – A Fly for September
Hook: Kamasan B110 heavy grub hook, size 10.
Thread: Veevus, 12/0, shade C12, (tan).
Abdomen & Thorax Cover: 2.8mm. orange or tan foam cylinder, trimmed to a point at one end.
Legs: 6 Cock pheasant centre tail fibres, knotted twice.
Wing: 2 Cree cock hackle points.
Hackle: Ginger cock, trimmed below the hook shank, if required.
Thorax: Hare’s Ear Plus dubbing, gold.

Photo 1. Secure the hook in the vice and starting at the eye, wind on the thread in touching turns to opposite the hook point and remove the excess thread. Trim one end of the foam cylinder to a point.
Photo 2.With the pointed end of the foam cylinder extending rearwards for about an inch, tie in the foam cylinder on top of the shank and make a couple of locking thread turns onto the hook shank in front of the foam. Follow this by dubbing a small amount of the hare’s ear fur onto the thread and wind it on immediately in front and tight up against the foam cylinder to create a small pad. This should cover the thread wraps under the foam and push the remaining foam into an upright position.


Photo 3.Align the tips of 6 knotted pheasant tail fibres and with the fibres equally divided along each side of the abdomen and extending well past the end of the foam body, tie them in securely and remove the waste fibre stubs.
Photo 4.Align the tips of two Cree hackle points and tie them in approximately the same length as the body. Manipulate the hackle points so they splay outwards in a wide V shape and lock in position with figure of eight thread wraps, then remove the excess feathers.


Photo 5. Using well waxed thread, tie in the cock hackle by its stalk and return the thread to the rear of the thorax.
Photo 6. Dub more dubbing onto the thread and wind on a fairly substantial thorax, stopping about 1mm. from the eye.


Photo 7. Wind the hackle in open turns over the thorax, tie it down securely at the eye, and remove the waste hackle.
Photo 8. Part the hackle fibres on top of the thorax and bring the upright foam forward over the top of the thorax and tie it down securely, finishing off with a couple of locking thread turns in front of the foam and immediately behind the eye.


Photo 9. Apply some varnish to the thread, whip finish through it and cut off the thread. To complete the fly, cut off the excess foam leaving a small stub over the eye.
Tying Tips
- A flat tying thread is less likely to cut through the foam, but always make a couple of locking thread turns onto the hook shank in front of the foam to avoid excess pressure being applied to the foam. If using Veevus thread as in the specification, spin the bobbin holder anticlockwise to flatten the thread whenever tying down onto the foam.
- A small dab of superglue can be applied to the hook shank at the tie in point for the foam body which will help to secure the foam and prevent it slipping round the shank.
- Foam cylinders are widely available from good material suppliers, but I prefer to cut my own using a set of Gunville foam cutters (from Upavon Fly Fishing) and deep blocks of Wapsi high density foam.
- I am convinced that the long legs in this pattern is an important trigger point, so don’t be shy with the length of legs.
- When tying in the wings, I simply align the hackle point tips one on top of the other and tie them straight onto the hook. Once secure on the shank, I separate the points either side of the foam and wind figure of eight thread wraps between the hackle points trapping the wings in place.
- In calm conditions, I trim away the hackle fibres below the shank, so the fly sits right in the surface film.
Les Lockey – Aug ’23
The Threadless Green Diawl Bach – A Fly for August
Hook: Competition Medium, sizes 10 or 12, (from Flybox), or similar.
No Thread: Use Hends 0.69 green holographic tinsel.
Tail: Red game cock hackle fibres.
Rib: Hends 0.69 green holographic tinsel.
Body: Single green peacock herl.
Head: Hends 0.69 green holographic tinsel.

Photo 1. With the hook secured in the vice, leave a 3 inch long tag end of tinsel, and start winding the tinsel from the eye to halfway down the shank. Do not cut off the tinsel tag as this will be used for the rib.
Photo 2. Align the tips of a bunch of cock hackle fibres and use the tinsel to tie them down on top of the shank as a tail. Continue to bind down the fibres to a point just past the hook point and trim the butt ends to the same length as the body.


Photo 3. Use the tinsel to tie in a single peacock herl leaving the butt end the same length as the body. Secure the peacock herl by binding down the butt end with tinsel to just before the eye and if necessary, remove any excess herl.
Photo 4. Wind the herl up the shank in touching turns, secure with tinsel at the head and remove the excess herl.


Photo 5. Bring the tag end of tinsel up the body in an open spiral as a rib. Secure the rib with tinsel and remove the excess tinsel rib.
Photo 6. Align the tips of a bunch of cock hackle fibres and using the tinsel, secure them in as a beard hackle, and remove the waste hackle fibres.


Photo 7. Tidy the head with tight wraps of tinsel, whip finish, cut away the tinsel and varnish the head to complete the fly.
Tying Tips
- The tying method for this fly is rather unusual in that it uses Hends 0.69 holographic tinsel instead of tying thread to construct the fly. As such, it is likely to prove a true test of your fly tying skills. However, it is essential to use Hends 0.69 holographic tinsel, as all other tinsels are simply not strong enough for the job.
- I find the best way of tying this pattern is to simply load the spool of tinsel onto a heavy bobbin holder and then use the tinsel as you would a bobbin of thread. However, unlike thread, the tinsel must be kept flat and under tension throughout the whole tying process to avoid any slippage, so always unwind any twists before winding the tinsel. Using a heavy bobbin holder will ensure the tinsel is kept under tension even when the bobbin holder is left to dangle while manipulating the other materials.
- Hends tinsels come in two sizes: the thinnest being 0.100, and 0.69 which is the one used here. They also come in a variety of different colours, so you can ring the changes if desired. Gold and red versions are well worth having in your fly box.
- Despite its fine dimensions, Hends tinsel is remarkably strong, so don’t be frightened to apply pressure where needed. However, do not add more tinsel wraps than necessary, as this will cause the tinsel to slip. You can however wax the underside of the tinsel for additional adhesion if necessary.
- A 3 turn whip finish can be done either by hand or with a whip finish tool in the normal manner, remembering to keep the tinsel under tension at all times during the process and do not be tempted to use more than 3 turns as the tinsel will not pull through.
- Hends holographic tinsels are available online from Tungsten Beads Plus and The Fly Tying Company.
Les Lockey – July ’23
The Elastic Caddis Pupa – A Fly for July
Hook: Fulling Mill Czech Nymph, sizes 14 and 16.
Underbody: Fine copper wire.
Thread: Lt. Cahill Uni 8/0 for the abdomen and dark brown UNI 8/0 for the thorax.
Abdomen: Strong and Stretchy elastic jewellery cord, Amber.
Pre-Thorax: Peacock Ice Dub.
Legs: Brown partridge feather fibres.
Thorax: Dark brown SLF Squirrel Dub.
Horns: 2 Bronze mallard fibres.

Photo 1. Firmly secure the hook in the vice and starting opposite the hook point, wind on a bed of copper wire to part way round the bend and break off the excess wire. Form a tapered wire underbody by winding on 3 or 4 layers of copper wire, each layer being slightly shorter than the one before and when complete, break off the wire at the start point. To avoid any slippage, lightly coat the wire underbody with superglue and allow to dry thoroughly before continuing.
Photo 2. Catch on the Lt. Cahill thread in front of the wire and keeping the tag end tight, wind the thread over the wire and then remove the waste thread. Continue to make a few more thread turns after the end of the wire and then return the thread to the thorax covering as much of the copper wire as possible.


Photo 3. Take a 4 inch length of elastic cord and cut one end to a shallow angled point. Using well waxed thread, securely tie down the point in front of the copper wire and once secure, stretch the cord rearwards and bind it down with tight thread turns, then return the thread to the thorax.
Photo 4. Keeping the elastic cord under tension, wind it tightly up the shank and tie it down securely at the thorax with well waxed thread. Cut off the excess cord at a shallow angle and tidy the area with thread.

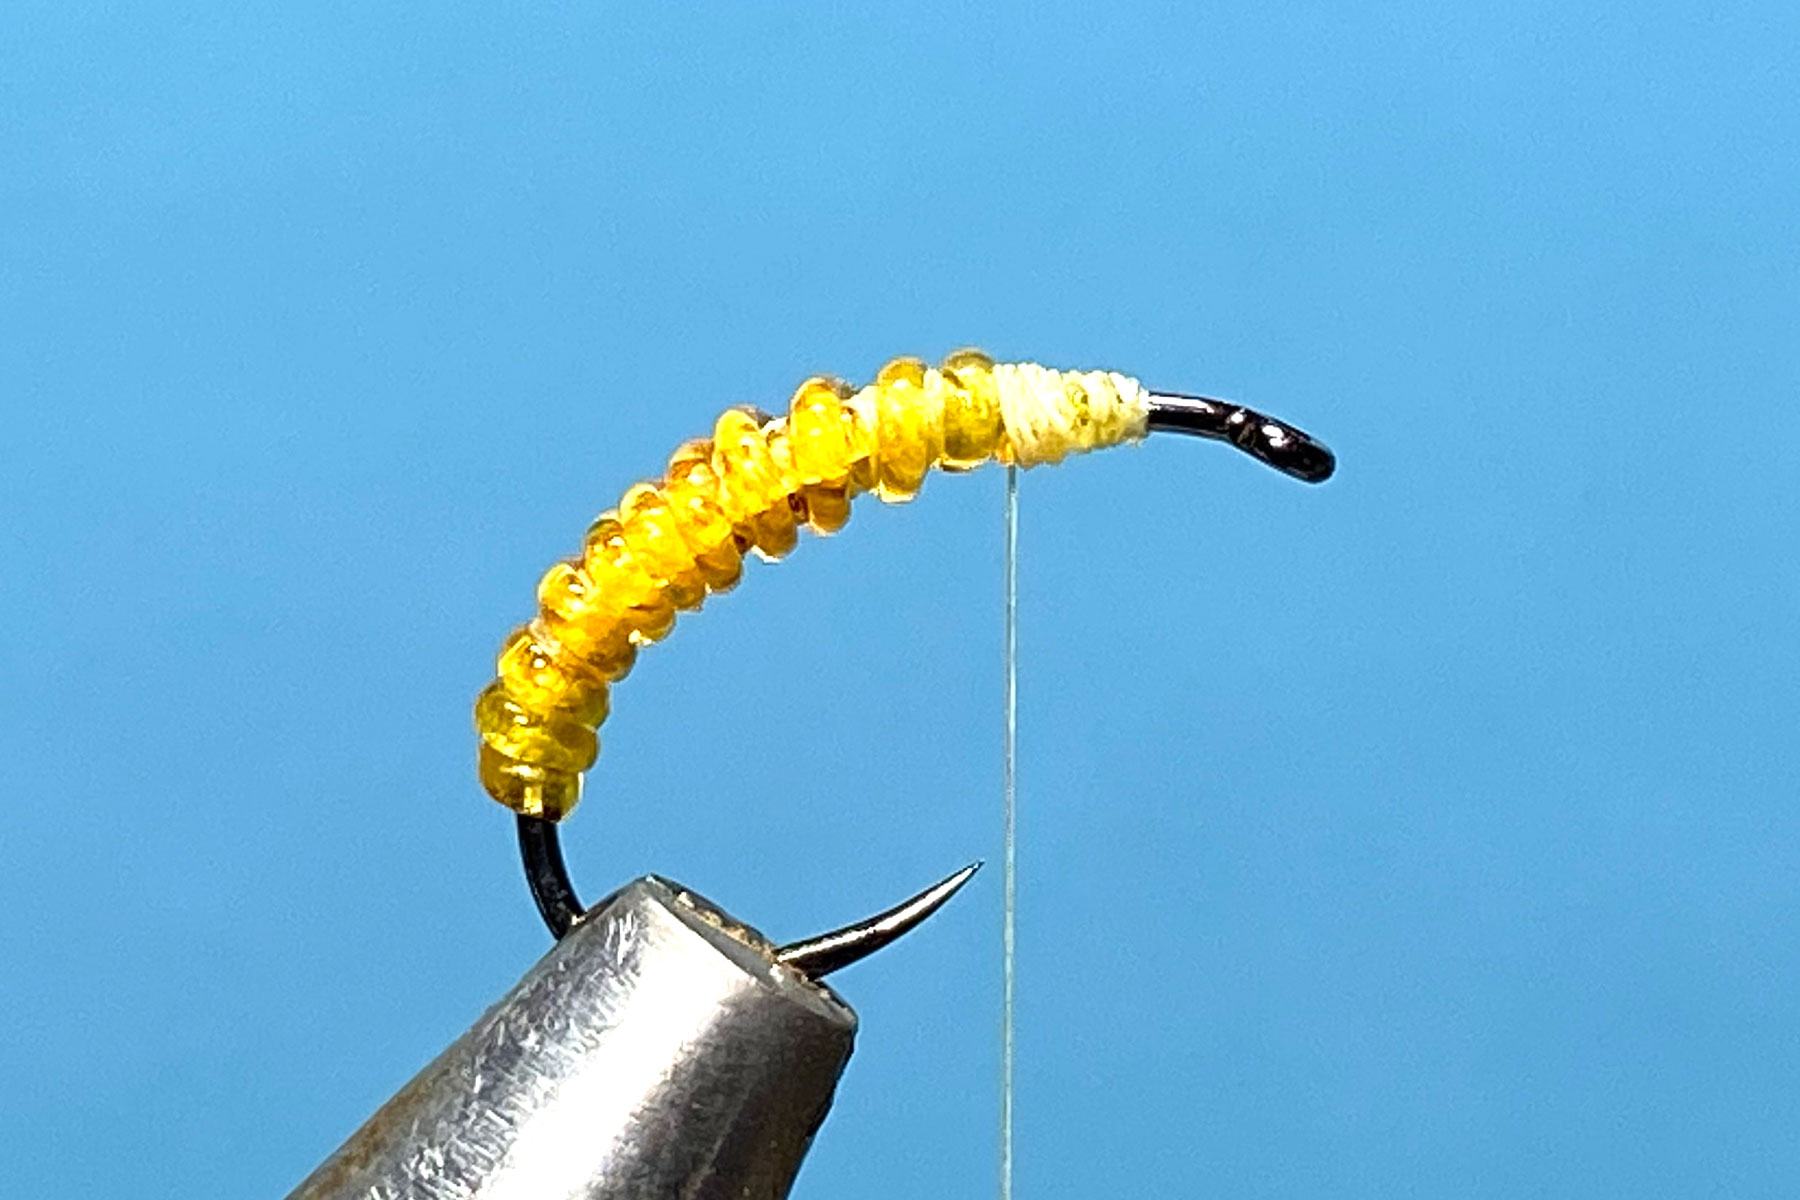
Photo 5. Dub a small pinch of Ice Dub onto the thread and wind on the dubbing as a pre-thorax, over and in front of the last turn of cord. Attach the brown thread at the eye and use it to secure the yellow thread. Remove the yellow thread and the brown thread tag and tidy the area with brown thread.
Photo 6. Cut out the tip of a brown partridge feather to form a V shape. Remove all the basal fibres from the stem leaving about 10 fibres on each side of the stem. Angle the V down either side of the shank so the fibres sit equally along each side of the abdomen and are about the same length as the hook, then secure the feather in position with a few thread turns and remove the waste feather, leaving he thread at the head.


Photo 7. Dub some SLF squirrel dub onto the thread and wind on a tapered thorax, returning the thread to the eye. Use Velcro to lightly brush out some fibres from the sides of the thorax, taking care not to catch the tying thread, then with your fingers, massage the fibres rearwards ensuring any fibres pointing forward of the eye are stroked back and held in position with a few turns of thread.
Photo 8. Align the tips of 2 bronze mallard fibres and tie them in pointing rearward and about twice the length of the hook, then remove the waste ends.


Photo 9. Form a neat head, whip finish, remove thread and varnish the head to complete the fly.
Tying Tips
- Make sure the hook is securely clamped in the vice as it needs to withstand considerable pressure when the elastic cord is stretched.
- To help control the copper wire when winding the underbody, I put the bobbin of copper wire into an old ceramic bobbin holder. For a heavier fly, use thin strips of self- adhesive lead sheet to build the underbody.
- Don’t get too hung up about the neatness of the underbody as the thread and elastic cord will mask any minor imperfections.
- It is a good idea to tie the wire underbodies in batches to give the superglue plenty time to dry thoroughly.
- Strong and Stretchy jewellery cord comes in a variety of colours and 3 different thicknesses – 0.8 is the most useful size for fly tying, but the thinner 0.5 version is good for buzzer bodies so it might be worth buying both sizes. A pack of 8 spools of different colours can be bought very cheaply from eBay.
- The original pattern used yellow jewellery cord, but I find the amber colour works best for me. Green is another good colour to try.
- Fine vinyl D rib from Veniards is perhaps the best alternative to the jewellery cord, but it is much less stretchy and as a result, creates a rather thick body, although soaking the vinyl rib in hot water will improve its stretchability a little.
- An alternative method for tying the legs is to tie in the partridge hackle by its tip and wind on a few turns of hackle in the usual way, and when secure, cut off the top and bottom fibres.
- I find it is easier to create a tapered thorax by winding the dubbing from the hook eye rearwards and then back towards the eye. This helps to avoid the dubbing slipping forward over the eye while maintaining the desired tapered shape.
- For security and neatness, when tying in the horns, fold the stub ends back and tie them down with thread before cutting off the waste ends.
Les Lockey – June ’23
The Quill Cormorant – A Fly for June
Hook: Competition Barbless, size 10, from Flybox, or similar.
Thread: Black GSP 50D, or any fine flat thread.
Body: Black thread as above.
Rib: Natural stripped peacock eye quill, body and rib coated with UV resin and cured.
Throat: A few strands of fluorescent orange marabou.
Wing: Black marabou tip fibres.
Cheeks: Split Jungle Cock nail.

Photo 1. Start the thread at the hook eye and lay down an even bed of thread to just past the hook point then remove the waste thread.
Photo 2. Tie in the peacock quill and bind it down with touching thread turns to the thorax position and remove the waste quill.


Photo 3. In slightly open turns, wind the quill over the thread body and tie it down at the thorax. Remove the excess quill and lightly coat the whole body with UV resin then cure with a torch.
Photo 4. Take 4 or 5 strands of orange marabou and tie them in by their tips. Add a tiny drop of superglue to the thread bindings and carefully wind the marabou fibres in close touching turns over the glue. Secure with thread at the head, remove the waste marabou and tidy the area with thread.


Photo 5. From the tip of a marabou plume, align the ends of a small bunch of fine marabou fibres and tie them in as a wing. Remove the waste fibres and tidy the head.
Photo 6. Tie in a split jungle cock nail equally on each side of the wing and remove the excess feather.


Photo 7. Form a neat head, whip finish and remove the thread. Varnish the head to complete the fly.
Tying Tips
- A flat tying thread helps to produce a smooth and even body onto which the quill can be wound. Remember to spin the bobbin holder anticlockwise to keep the thread flat.
- To keep the quills supple and reduce the risk of breaking, prior to use, soak them for 10 minutes in a mixture of warm water and a few drops of fabric conditioner.
- Before applying the resin, make a couple of half hitches in the thread to avoid any slippage.
- Apply the UV resin sparingly and if possible, rotate the vice to help avoid forming a resin “belly” before curing with the torch.
- Only 4 or 5 marabou fibres are needed for the thorax, but to keep it in proportion, use marabou fibres that are short in the flue. Try not to twist the marabou as you wind it over the merest hint of superglue, and carefully stroke the flue rearwards after each turn ensuring the flue does not get pressed into the wet superglue.
- Try different colours of marabou for the thorax. Red, sunburst, chartreuse, black and white all make useful alternatives.
- To create the wing, rather than just pulling off a bunch of fibres from the marabou feather, I find a much more manageable and neater and method is to snip out the very tip of a marabou plume to form a V, then snip off the top centimetre or so of stem. The fibres from this cut section can then be stroked together to align the tips. This allows the wing to be easily gauged for length and density and adjusted as required, before being tied in. Further sections of stem can be cut from the same feather up to the point where the fibre tips become “fluffy”, and by cutting them all out at the same time, it speeds up tying further flies.
Les Lockey – May ’23
The Foam Bodied Hawthorn- A Fly for May
Hook: Kamasan B160, short shank, size 12.
Thread: Fine black thread, eg. Veevus or Sheer 14/0 or similar.
Detached Body: 1/16” diameter, black foam cylinder and two strands of bronze peacock herl.
Legs: 2 Single black pheasant tail fibres, knotted once.
Wing Post: Aero Dry Wing, white.
Hackle: Black cock saddle.
Thorax: Black seal’s fur, dubbed.

Photo 1. For the detached body, start by securing a fine sewing needle in the vice. Now wax a 3 inch tag end of thread and wind on 3 or 4 turns of thread as close to the needle point as possible. Do not cut off the thread tag as this will be used later to tighten the construct and also to help secure the body to the hook. Pinch off one end of the foam cylinder.
Photo 2. Impale the pinched end of the cylinder onto the point of the needle and secure it in place with 3 or 4 overlapping turns of thread. At the same point, but under the needle, tie in 2 strands of peacock herl using no more than 2 more turns of thread. This forms the first segment of the body.


Photo 3. To form the next body segment, lift up the foam, peacock herl and thread tag and wind on 2 or 3 open turns of thread moving a short distance down the needle, then ensuring the herl is under the foam, secure all the materials onto the needle with 2 more thread turns.
Photo 4. Repeat this process, increasing the size of the segments as you move down the needle until 5 or 6 segments have been completed, then whip finish, and leaving thread and herl tags of about 4cm. in length, cut off the excess. Gently but firmly push the foam body off the needle. Tighten the construct by holding the body while gently pulling both tag ends of thread and set aside for later.


Photo 5. To tie the fly, remove the needle from the vice and clamp in the hook. Run on a bed of thread from the eye to opposite the hook point and remove the waste thread. Tie in the 2 knotted pheasant tail legs, one on either side of the shank, trailing backwards. Bind down the fibre ends and remove the excess, leaving the thread mid way between the point and the eye.
Photo 6. Tie in centrally a length of Aero Dry Wing on top of the shank, and while gently pulling both ends upwards, take a couple of horizontal locking thread turns around its base, immediately above the hook shank.


Photo 7. Strip away the fluffy fibres from the bottom of the cock saddle hackle and trim the bare stem to about 3-4 mm in length. Using well waxed thread, tie in the hackle stem at the base of the wing post leaving about 2 mm. of bare stem above the shank. Carefully wind the thread around both the base of the wing post and the bare hackle stem, ensuring each subsequent thread turn winds upwards until the bare hackle stem is covered, then return the thread back down the post to the shank and left at the rear of the wing post. This is called “posting the hackle” which basically creates a support so the parachute hackle can be wound horizontally down the post.
Photo 8. Take the foam body construct and with the herl on the underside, securely tie it in behind the wing post and remove the excess foam. Bring the herl and thread tags in front of the wing post and tie them down securely with a few tight thread wraps, then remove the waste herl and thread tags. Return the thread to the rear of the wing post.


Photo 9. Dub a pinch of seal’s fur onto the thread and wind the dubbing over the cut foam and in front of the wing post to form the thorax.
Photo 10. Carefully wind the hackle horizontally down the support post, ensuring each turn is wound directly beneath the previous turn, then carefully secure the hackle at the eye with a few tight thread wraps. Remove the excess hackle and stroke the hackle fibres back from the eye to form a neat head.


Photo 11. Add a drop of varnish to the thread and whip finish through it, then remove the thread. Manipulate the hackle fibres back to their correct position and trim the wing post to length to complete the fly.
Tying Tips
- This is quite a lengthy tying process, as the detached body must be constructed first before the fly can be completed but catch results have proved the effort is very well worthwhile.
- I find it best to make the detached foam bodies in batches. This not only speeds up the tying process, but it also means I have a stock of bodies ready to use whenever the need arises.
- 2x2mm. strips of foam can be used as an alternative to foam cylinders, although cylinders do produce more natural looking bodies. Pinching off the end of the cylinder continues this theme.
- A fine round tying thread is best for the formation of the foam bodies, as it maximises the segmentation effect in the body.
- In order to keep the finished fly in proportion, the foam body should be about 12 – 14 mm long from tip to whip finish point.
- Cock saddle hackles produce much neater parachute hackles, and their extra overall length allows them to be easily wound by hand without the need for hackle pliers. About 5 or 6 hackle turns is about right, although this will depend on the quality of hackle used.
- When tying in parachute hackles, it is generally accepted that the good shiny side of the feather should be facing the tier, as this results in the fibres pointing slightly upwards, making it easier to wind the next turn of hackle underneath. However, I prefer the hackle to be tied in with the dull underside facing the tier, which results in the fibres pointing slightly downwards. This requires more care to avoid trapping the fibres as you wind the hackle down the post, but I am convinced that downward pointing hackle fibres produce a more realistic footprint on the water surface, and as a result, makes the fly even more effective.
- It can be helpful to hold the wing taught in a gallows tool when winding parachute hackles as this frees up both hands to rotate the hackle around the wing post, but with a little practice, hackles can be wound without this attachment. In this case, hackle tension is key to success. Winding the hackle clockwise, the away turns need to be under light tension, then while holding the wing taught, the hackle is returned under greater tension. In essence, only increase tension when the wing post is being held taught. Applying tension while the wing is unsupported will cause the wing to collapse and the hackle turns to slip off the wing.
- After the parachute hackle has been formed and tied down, I carefully separate the 2 wing post strands and add a small drop of thin varnish at their base which ensures the hackle will not slip off the wing post.
- Trim the wing to your preferred length. A long wing makes spotting the fly easier, while a short one gives better presentation. I usually leave the wing quite long and trim it on the day to suit the prevailing conditions.
- To prolong floatation, I brush the hackle and wing post with liquid silicone and allow to dry thoroughly overnight, before transferring the flies to my box.
- This pattern can be easily adapted to make an excellent Heather Fly imitation to be fished later in the season. Simply change the colour of the legs and the rear part of the thorax from black to red.
Les Lockey – April ’23
The Kate McLaren – A Fly for
April
Hook: Kamasan B170, sizes 10 to 14.
Thread: Black Semperfli Nanosilk, 50D, or any 8/0 black thread.
Tail: Golden pheasant crest feather.
Rib: Oval Silver tinsel, medium..
Body: Black seal’s fur
Body Hackle: Black cock.
Head Hackle: Red game hen.

Photo 1. Secure the hook in the vice, wind on a bed of thread from the eye to just before the bend and remove the waste thread.
Photo 2. Tie in a golden pheasant crest feather on top of the shank as a tail and trim the waste end to the length of the body. Follow this by tying in the oval tinsel and again leave the waste end the same length as the body. Now bind down all the waste ends with thread and return the thread to the tail.


Photo 3. Dub some seal’s fur onto the thread and wind the dubbing up the shank to form a slightly tapered body.
Photo 4. Using well waxed thread, tie in the cock hackle by its stalk. Palmer the hackle by winding on 2 turns of hackle one behind the other, before continuing to wind the hackle in open spirals down the body to the tail. At this point, trap the hackle with a turn of the silver tinsel and continue to wind the tinsel in open spirals up the body and through the hackle fibres, before tying it down securely at the head. Remove the excess hackle tip, trim off the waste tinsel, and tidy the head area with a few wraps of thread ready for the head hackle. If required, lightly brush the body with Velcro to tease out a few fibres into the hackle.


Photo 5. Tie in the hen hackle by its tip, immediately in front of the body hackle and remove any excess tip. Winding towards the eye, wind on 3 or 4 turns of hackle, stroking the fibres back after each turn. Secure the hackle with thread and remove the waste hackle.
Photo 6. Tidy the head with thread, whip finish, remove the thread and varnish the head to complete the fly.


Tying Tips
- Golden pheasant crest feathers often suffer from kinks and twists, which if not too severe, can still be used by simply holding the feather by the tip when tying it in. This should push the twist into the waste part of the feather, leaving the tail straight. For badly twisted feathers, soak them in boiling water for about 30 seconds, before removing them one at a time with a pair of forceps and mould the feathers around a smooth curved surface, such as the neck of a glass bottle or metal rod and leave them to dry. When dry, the feathers will be back to their pristine best, having taken on the curve of whatever substrate they were wrapped around. If the above is too much effort, yellow cock hackle fibres are a reasonable substitute, or for a more modern twist, try using Glo Brite floss, shade No. 11, Phosphor Yellow, or No. 12, Lime Green, or for something a little bit different, try No. 8, Amber.
- Many people find dubbing seal’s fur a tricky task, but in most cases, this is simply down to applying too much fur onto the thread at one time, but the following tips might prove helpful. Apply seal’s fur sparingly and with moistened fingers and always twist the dubbing in the same direction. Pay particular attention to the fibres closest to the shank, as the first turn or two will anchor the dubbing to the shank allowing the remaining fibres to be twisted around the thread in stages as more thread turns are made. Baby seal’s fur is softer and less springy than adult fur making it much easier to use, but unfortunately, it can be quite difficult to obtain. For particularly springy adult fur, mesh the fibres together by rubbing the fur into a ball in the palm of your hand before teasing it out onto the to the thread. Alternatively, try mixing the seal’s fur with a pinch of the same coloured rabbit fur, as this helps the fibres to bind to the thread.
- To prepare the cock hackle, remove the waste fibres from the base of the hackle stem, and trim the stem to a length of 1-2mm. With the good side of the feather facing forward towards the eye, tie in the short stem using well waxed thread. This keeps bulk to a minimum and helps in the formation of a neat head.
- When winding the rib, don’t worry about catching body hackle fibres, just bring the rib briskly through the hackle and the stiff cock hackle fibres will spring out of the way.
- I like the brown hen hackle to be slightly longer than the black body hackle as this helps maintain the tapered proportions of the fly. To prepare the hen hackle, clamp the tip of the feather in a pair of fine hackle pliers and gently stoke back all the other fibres so the tip is clearly exposed. Remove the pliers and cut off the tip to leave a small triangular stub about 1mm. in length and use this stub to tie in the hackle with well waxed thread. This avoids trimming the feather tip after it is tied in, and helps to produce a small, neat head.
- Before winding the hen hackle, “double the hackle” by holding the hackle stalk while gently stroking the fibres together. This leaves the stem as a clean leading edge with the hackle fibres pointing rearwards. Continue to stroke the fibres back as each turn of hackle is made to maintain the shape and neatness of the finished hackle.
Les Lockey – March ’23
The Copper Cruncher – A Fly for November
Hook: Kamasan B175, size 10 or 12.
Thread: Copper Semperfli Nanosilk, 50 Denier.
Tail: Red game cock hackle fibres.
Rib: Fine copper wire.
Abdomen: Natural cock pheasant centre tail fibres.
Cheeks: Medium copper holographic tinsel.
Thorax: 3 strands of peacock herl.
Hackle: Greenwell’s hen hackle.

Photo 1. Start the thread behind the eye and wind on a bed of thread stopping just past the hook point.
Photo 2. For the tail, align the tips of a small bunch of red game cock hackle fibres and tie them in about the same length as the abdomen using two thread wraps wound towards the bend then trim the stub ends the same length as the abdomen. In similar fashion, tie in a length copper wire using two thread wraps wound towards the bend, leaving the stub end the same length as the abdomen.


Photo 3. Align the tips of a small bunch of cock pheasant centre tail fibres and tie them in by the tips. Now bind all the ends down with a single layer of thread, stopping at the thorax.
Photo 4. Reverse wind the pheasant tail fibres up the shank to form a slim, neat abdomen. Tie the fibres down at the thorax and remove the excess fibres.


Photo 5. Wind the wire as a rib, in open spirals up the abdomen, tie down at the thorax and continue to bind down the wire with thread to the eye then worry off the wire.
Photo 6. Tie in a length of holographic tinsel on each side of the shank, then tie in the three strands of peacock herl and bind down all the ends down with neat turns of thread.


Photo 7. For the thorax, wind on the peacock herl in the reverse spiral, tie down near the eye and remove the excess herl. Now bring both pieces of tinsel forward along the sides of the thorax, secure with thread at the eye and remove excess tinsel.
Photo 8. Tie in a Greenwell’s hen hackle by the tip and wind on 2 or 3 turns of hackle, secure with thread and remove excess hackle.


Photo 9. Form a neat head, whip finish, remove the thread and varnish the head to complete the fly.
Tying Tips
- The fibres for the tail and abdomen are best aligned while still attached to the feather stem – simply stroke the fibres away from the stem until the tips line up, then hold the fibres tight and pull the stem away from the fibres.
- To ensure a slim abdomen, tie in the pheasant tail fibres by their tips. The easiest way to do this is to hold the pheasant tail fibres on top of the hook shank with the tips pointing forward over the eye and make one lightly tensioned thread turn over the base of the fibres and onto the shank. Now while maintaining tension, pull the fibres back towards the bend until just the very tips are caught in. At this point bind down all the butt ends of material with touching turns of thread, stopping at the thorax.
- A more robust abdomen will be formed if the pheasant tail fibres are wound in the opposite direction to the thread and the wire rib wound in the same direction as the thread. This will not only anchor the fibres more securely, but the rib will also be much more visible. Alternatively, the fibres could be wound over a thin coat of varnish or superglue and the rib angled across the pheasant tail fibres.
- Peacock herl is quite a delicate material, particularly at the tip, so trim the tips by about half an inch and tie them in using the same tensioned single thread turn method used above. Wind the herl in reverse spiral back and forth over itself a couple of times before tying down, then take a couple of open thread turns through the herl and back to the eye to strengthen the thorax.
Les Lockey – October ’22
Lake Vyrnwy in August 2022
As promised to myself in June a return visit to the Lake. We originally booked for July when the temperatures reached the high 30’s! So cancelled and rebooked for the 8th of August, that turned out to be nearly as hot! The Lake was well down, normally we would sail from the dock but it was dry! The Lake was down over 30’. The village was not showing, but we did hit a “Wall” on a drift! (Village now showing 15/8/22).
The lake at very low level.


The iconic tower.

The first fish and it’s a Chubb! Only 2 – 3lb!!

My effort – at least it was a brown.
Two best fish were a Brown of 1 1/2 to 2lb and a Chub of over 6lb. All fish were taken on Dries and on drifts, no anchoring, only light touches with the electric motor to keep the boat on course. We fished from 10:30am to 5pm and still had power in the 1st battery (2 are supplied). Only one other was fishing, he stayed out for just 2 hours (guest at the hotel) and had one Brown of 2lb. He only drifted the bank below the hotel. All fish were returned, the water was very cold, and all swam away strongly. I have fished Lake Vyrnwy since the early 80’s and knew that there were Chub in here, but thought they were at the bottom end (reed beds). Anyone who says they do not put up a fight has NOT caught one of these. They fought deep and hard all the way. Be aware that there is only one boat station at the moment with a limited number of boats. The lower end of the lake is shallower, but the reed bed area is dry. If possible I may even make a 3rd trip this year, it was THAT GOOD !!!


Eddie Wilkinson – September ’22
The Rabbit Perch Fry – A Fly for October
Hook: Kamasan B800, size 10, lure hook.
Thread: White Semperfli Nanosilk, 50 Denier, or any strong white thread.
Underbody: Fine lead wire, wound over superglue and covered with white floss.
Tail and Back: Black barred olive rabbit strip.
Body: Pearl Lite Brite, or similar, dubbed to form a fat carrot shape.
Eyes (Optional): Jungle cock nails.

Photo 1.Place the hook in the vice and lightly coat the shank with superglue from opposite the hook point to about 2mm from the eye. Now wind on the lead wire in touching turns over the superglue then remove any excess wire.
Photo 2.Catch on the floss behind the eye and wind it over the lead underbody until the lead is covered. Continue winding the floss to form a carrot shaped underbody, then wind on the thread over the floss and cut away the floss, leaving the thread at the barb.


Photo 3.Part the fur about 1cm. back from the end of the rabbit strip and at this point, tie it in securely on top of the shank, then make two locking turns of thread directly in front of the strip.
Photo 4.Dub a generous noodle of pearl Lite Brite onto the thread and wind it up the shank to form a substantial carrot shaped body. Several applications of dubbing will be needed to complete the body.


Photo 5.Pull the rabbit strip forward over the top of the body, part the fur near the hook eye and while keeping the rabbit strip tight, tie it down securely.
Photo 6.Cut off the excess rabbit strip leaving as little hide as possible near the eye, then tidy the head area with thread and trim the body to remove any long straggly fibres.


Photo 7.Tie in a jungle cock nail on each side of the fly.
Photo 8.Remove the waste jungle cock stems and form a neat head. Whip finish, remove the thread and varnish the head to complete the fly.


Tying Tips
- Heavy wire hooks are essential for fry patterns, as takes can be very aggressive.
- Leave plenty of space between the hook eye and the start of the lead wire for the head.
- Use a good strong thread to ensure the rabbit strip is securely held in place.
- When starting to cover the lead with floss, hold the floss tag along the side of the lead and wind the floss at an angle onto the tag. This will help stop the floss from slipping between the wraps of lead.
- Comb out any loose under fur from the rabbit strip before use. If the rabbit strip is kinked or the fur misaligned, rinse the strip in warm water, dab dry with a kitchen towel and blow dry with a hair drier. This will straighten any kinks in the hide and produce a lovely fluffy strip with the fur directionally aligned.
- When tying in the rabbit strip, create a parting in the fur and slightly moisten the hair to maintain the parting. Position the rabbit strip on the side of the hook shank, so that the parting is in line with the barb, then make one full turn of thread in the middle of the parting. This will bring the rabbit strip into the correct position on top of the shank where it can be secured in place with several tight thread wraps.
Les Lockey – September ’22
The App’s Bloodworm (Fluorescent Pink) – A Fly for September
Hook: Fulling Mill Heavyweight Champ FM50 05, size 10 or 12 or similar heavy wire hook.
Thread: Glo Brite Floss No. 2, fluorescent pink.
Rib: Medium Black wire.
Body: Glo Brite Floss No. 2, fluorescent pink, coated with UV resin and cured with a torch.
Legs: 2 lengths of fluorescent pink Perfect Rubber.

Photo 1. Place the hook in the vice, catch on the floss behind the eye and wind on a few touching turns then remove the excess floss tag.
Photo 2. Catch in the wire rib under the shank and with touching turns of floss, bind it down to just before the bend of the hook and return the floss to about 1 mm. from the hook eye.


Photo 3. Align 2 strands of Perfect Rubber along the top of the hook shank with about 4cm. forward of the eye, then tie them in securely by winding a few wraps of floss rearwards, leaving two long front legs.
Photo 4. . Stretch the remaining rubber strands rearwards, ensuring they stays on top of the shank and continue to bind them down with touching turns of floss to just before the hook bend. Now return the floss in touching turns to just before the eye.


Photo 5.Take one straight turn of wire directly over the top of the rear strands of rubber and then continue to wind the wire as a rib in open spirals up the body. Tie in the wire at the eye in front of the forward-facing legs and worry off the excess wire.
Photo 6. Form a neat head, whip finish and remove the floss.


Photo 7.Carefully coat the body with UV resin and cure with a UV torch.
Photo 8.Trim both pairs of rubber legs to the desired length to complete the fly.


Tying Tips
- This pattern is often tied using Spanflex or Flexifloss type material which I find produces rather curly legs. I much prefer Perfect Rubber, which is round in section and very stretchy, but is also limp and straight and to my eyes at least, produces a gentler and more seductive movement in the water. A cheaper alternative is Veniard’s round rubber which comes in two thicknesses and a variety of colours, but unfortunately, not fluorescent pink.
- I always use a bobbin holder when working with floss as this helps with tension control and avoids snagging the fine filaments.
- This pattern has given rise to many variants with colours ranging from pink to red and on through amber, olive, yellow, green, tan, white and even black, while the body can be thread, floss, or even glass sewing beads and the legs can vary in number from 1 to 8. My preference is for floss bodied patterns in either fluorescent pink, fluorescent red, or amber and with 2 legs front and back.
- Leg length tends to vary from tier to tier, but I like the front legs to be about 3 cm. long with the rear legs very slightly longer. Interestingly, I understand that Peter Appleby, who devised the fly, considers that trout are initially attracted by the body of the fly more than the pulsating legs, although once attracted, the legs help to encourage the trout to take the fly.
- I always protect the floss body by applying a fine coat of UV resin and cure it with a UV torch.
Les Lockey – August ’22
A Week at Coldingham Loch
A beautiful part of the country, Coldingham Loch in the South East Scottish Borders, on the coast, south of Edinburgh. This was the venue for Les and Mike and a whole week fishing from a boat. Six self catering cottages hidden around the Loch provide great accommodation and the superb proprietors, Gareth and Carmel, are totally dedicated to running a fabulous fishing and holiday venue.
We soon settled in after a fine pub meal in the village, then returned to gear up for the following morning. The Loch provides some of the best dry fly fishing I have experienced and Les, with his long term knowledge of the Loch, knew what flies to use. As it was Hawthorn time, that was the first choice. Emergers also worked well, as did foam head buzzers and small black hoppers. Despite some high winds, we still managed to get out every day. The Loch is crystal clear and holds abundant fly life, subsequently, the fish are in superb condition.


Leader strength had to be on the stronger side, as the fish can and do fight furiously. This lovely brown was caught on the first day and what a thrill to see such a magnificent specimen. More followed each day, with a fair few browns as well.
The fish on this occasion were feeding very specifically and adapting to the current seasonal fly life, hence the Hawthorn fly taking most of the fish. Takes could be confusing, as we discovered that the fish were taking in several different ways, sometimes smashing it, or sipping it, even smashing it and leaving it, sometimes sliding away with the dry fly, without a sign of movement on the water, so several strike actions were called for, which I suppose made things a bit more challenging.
We found some top class eating in local pubs, as Les knew with experience where to go. Good beer and wine and very friendly folk. We also had a BBQ night at the cottage and did it proud with locally produced steaks, fine wine and a few snifters, although we tried very hard to not over indulge….and failed ! Ever tried bananas on a BBQ ? ….. with a sprinkling of Malibu when cooked with added coconut ice cream. Well we didn’t have the Malibu or Ice Cream, so tried Botanical Gin and believe me, it was fabulous !!

Well I guess we had it all…. Great place, great food, great fishing… what more could you ask for. The Coldingham set up is for club members, or if you are hiring one of the cottages you can fish the Loch from boat or bank.

The season is from the middle of March to the end of November and the web site is….. http://www.coldinghamloch.co.uk A seventh heaven for fly fishers, with a very relaxing atmosphere and surroundings. The cottages get booked very quickly, as it is becoming a very popular holiday and fishing venue
Mike Warburton – July ’22
The Black Foam Beetle (Dry) – A Fly for August
Hook: Kamasan B160, short shank hook, size 10 or 12.
Thread: Black Semperfli Nanosilk, 50 Denier GSP thread, or any flat black thread.
Back and Head: A strip of black Evazote foam (from The Flytying Boutique) cut 5mm. wide for size 10, or 3mm. wide for size 12 hooks.
Body: A mix of black rabbit underfur and black Senyo’s Shaggy Dub.

Photo 1. Place the hook in the vice, catch on the thread behind the eye and wind it in touching turns to slightly round the hook bend, then remove the excess thread tag. Cut a strip of foam to the appropriate width for the hook being used and trim one end to a long point about the same length as the hook.
Photo 2. With the point of the foam strip just short of the eye, lay it on top of the hook shank and carefully tie it down, ensuring the foam remains central and on top of the shank. Initial thread turns should be firm, but not tight and widely spaced, progressing to the eye. Spin the bobbin holder anticlockwise to ensure the thread is flat and carefully flatten down any bulges with tighter thread wraps as you return the thread to the hook bend, although this might require several passes along the shank to achieve a smooth underbody.


Photo 3. Take a pinch of dubbing mix containing about 3 or 4 rubber strands and loosely dub it on to the thread, then wind it onto the shank. Repeat the process until the body is complete, just before the eye. (Usually about 3 or 4 applications).
Photo 4. Using a piece of Velcro, brush out any trapped rubber strands and try to direct them downwards.


Photo 5.Spin the bobbin holder anticlockwise to ensure the thread is flat, then gently pull the foam strip over the top of the body and carefully tie it down at the eye followed by a couple of locking turns in front of the foam.
Photo 6. Add a spot of varnish or superglue to the thread, lift the foam strip away from the eye, whip finish and remove the thread. To form the head of the beetle, gently pull the foam strip in line with the shank and while under tension, cut the foam just in front of the hook eye, using a single straight cut. Finally, trim the rubber strands level with the keel of the hook to complete the fly.


Photo 7. The pattern from above.
Tying Tips
- This pattern is a good test of thread tension control and using a flat thread will certainly help to lessen the chance of cutting through the foam. It also helps if initial thread turns are quite light with tension gradually increasing with each turn of thread. Wherever possible, try to make securing turns directly in front of the foam as this will take any further pressure away from the foam.
- Evazote foam is a closed cell, cross linked, copolymer foam with a sheen that makes it ideal for beetle patterns. It is slightly thicker and more resilient than other fly tying foams, but it should not be over stretched as this will reduce its buoyancy.
- For better accuracy and straighter edges, I cut the foam into strips using a scalpel and a metal ruler.
- The original dubbing for my beetle pattern was Rub-a-Dub dubbing from Doug Swisher in the USA, which had lots of rubber fibres ready mixed into the rabbit fur but sadly, this is now unavailable. I now make a very similar substitute dubbing by mixing rabbit under fur with Senyo’s Shaggy Dub (a silicone based, rubber like material) in an electric coffee grinder.
- An alternative tying method for the body is to create a dubbing loop after initially tying in the foam strip, dub the body with rabbit fur, insert some Shaggy Dub fibres into the loop and spin using a dubbing twister to form a leggy rope that can then be wound like a rib over the fur and tied off at the eye.
Les Lockey – July ’22
At Last – The return to Lake Vyrnwy
It has been 3 years since my last visit but June 10th 2022 was the day. The day before, my wife and I were on a Mazda MX5 meeting with Michel Mazda (the dealership we bought the car from). This is a “ride out”, in Thursdays case 67 MX5’s, starting at Ellesmere Port.


Our morning stop was at the Rogan Estate on the banks of the River Dee at the back of Bala. Apparently, Mortimer and Whitehouse are due to fish this beat for their next series. Just over 150m from the manor house. Very neat and tidy, with a nice “hut” with BBQ. Apparently the river here hold a lot of “good” Grayling and the wading looks excellent.


The 2nd stop was Lake Vyrnwy for Lunch. I had carefully booked an overnight stay!


After lunch most of the other drivers went home. We had a walk to the village and on the way out of the hotel met Paul Morgan (Coch-y-Bonddu books at Machynllerth) He had been fishing, but had struggled to catch, using the same method that I was planning ! – not looking good for me. Friday started with a very nice breakfast, before my wife and I parted company, me to the boat and her to the Spa. I chose the the bottom end of the lake that I haven’t fished for at least 20 years ! This was on the recommendation of the staff, who thought it the best option for a poor day ??? The Lake was well down and the staff expected the “Village” to be in view by July. This did give a major problem, in that the trees would not be overhanging the water in many places. The water at the opposite end from the Dam is shallow and does have a weed bed, so insect life will be better in June (I hope). My plan was to “work” this area and the far bank, hoping for a rise or two, but failing that try under the far bank, hoping for a fall of terrestrials. Unfortunately Lake Vyrnwy has some very “Interesting” winds and wind lanes, so much so that at the far end of the lake, the wind can be in “Any” direction at any given time ? i.e. within 10m you can be drifting the near shore, then be blown out into the middle, then reverse back down the lake and carried to the far bank ? Not good for planning a drift ! This problem was taken away from me

By the time I had loaded up (two batteries and an electric motor) and driven the 41/2 miles to the boat station two other boats were already fishing the lower end of the lake. My only option was to fish back towards the dam ! I set up with a dry size 12 “Shiney” fly with a bright green nymph tied NZ style. I was fishing drogueless just using the electric engine to correct the drift.


Hook – Fulling Mill FM12 70 Living Larva size 12
Thread – Ultra 70 in white (whip finish coloured green with pen !)
Tail – Coc-de-Leon 3 or 4 fibres.
Rear half of body – dirty grey Poly yarn.
Front body – CDC split thread wound forward to eye in black.
Hackle – Black genetic cock, wound dense.
Thorax ? – Split the hackle underneath with “Large” Mirage Tinsel.
It took a while but I did get into my 1st Brown within 200m. After a couple more it was apparent that the nymph was not needed. The only problem I had was being in the boat alone as I missed opportunities by drifting out or past fish holding areas. Although no fish were rising, casting the dry within a few feet of the shore brought fish up. If I missed a fish, due to the wind, I struggled to repeat the area. It did not matter the fish kept coming. The “fun” started when I tried to go back ? The little electric motors (37lb thrust) did not make much headway against the wind, but it did get me back to some areas that “required” a second attempt.


By 3pm I had just managed the return to the boat station (all on one battery). I had done well with 16 Browns from a small 6” to an excellent 11/2lb. Most were in the 10oz size but fought well above their size.All the fish were caught on the “Shiney Fly”, including the 6” one. Only used 2 flies, the 1st lasted 10 fish , the second was “ragged” after just 6 ? – Note to self, Tie up some more !!! As room in an MX5 is limited I chose to fish my 7’ 6” ATFM 3 weight river rod with a small collapsible net, all worked well. In previous trips I had gone for my 10’ ATFM 4 weight. I found the change better as I was doing what I normally do on rivers, casting into tight spaces under bushes or close to stones, just felt right. As I write this my plan is to return soon, as I enjoyed the day so much. This happens everytime I go, but I never seem to make it back for the rest of the season, however this year ? Definitely ? Maybe ?
Eddie Wilkinson – June ’22
The Damsel fly Nymph – A Fly for July
Hook: Kamasan B170, size 10, medium wire hook or similar.
Thread: Olive Semperfli Nanosilk, 50 Denier, or any fine olive thread.
Eyes: Small, black metal, bead chain.
Tail: Olive marabou.
Rib: Small oval gold tinsel.
Abdomen: Olive marabou feather fibres.
Thorax cover: Cock pheasant centre tail fibres.
Legs: Thorax: Olive marabou, dubbed.

Photo 1. Place the hook in the vice, catch on the thread behind the eye and wind on a short bed of thread to the thorax position, cut off excess thread and return thread to about 2 mm. from the hook eye.
Photo 2. Catch in the bead chain under the hook shank and secure in position using figure of eight thread wraps over a small dab of superglue, then run the thread in touching turns down the shank to opposite the barb.


Photo 3. For the tail, tie in a small bunch of marabou fibres about the same length as the hook shank, then trim the waste ends at the thorax position. Catch in the oval gold tinsel rib with a couple of thread turns, ensuring the waste end stops at the thorax position. Follow this by tying in a small bunch of marabou fibres by their tips, with the tips extending to the thorax, then bind down all the loose ends with thread.
Photo 4. Without twisting the fibres, wind the fine marabou fibres up the shank, tie down at the thorax and remove the excess marabou. Now bring the oval tinsel rib up the abdomen in even, open turns, tie down at the thorax and trim off the excess tinsel.


Photo 5. Take a small bunch of cock pheasant tail fibres and trim off the tips. With the fibres pointing out over the hook eye, tie in the bunch on top of the shank, and bind down the fibres to immediately behind the hook eye, then return the thread to the rear of the thorax.
Photo 6. To form the legs, snip out the tip of a dyed yellow partridge feather to form a V shape. Leave about 8 -10 fibres either side of the V and remove all the other fibres. Position the V on top of the shank with the fibres on either side of the shank, pointing rearwards to about the barb position, and tie in the feather securely. Remove the excess feather stalk.


Photo 7. Take the thread to immediately behind the hook eye, dub a couple of marabou fibres sparingly onto the thread and wind on the dubbing immediately behind the hook eye. Continue to dub marabou fibres in small quantities so that the dubbing can be wound neatly between the bead chain eyes and on to form a slim thorax. Leave the thread at the rear of the thorax.
Photo 8. Pull the pheasant tail fibres straight back between the bead chain eyes and over the thorax and tie down at the rear of the thorax with two turns of well waxed thread. Add a drop of varnish or superglue to the thread and whip finish through it using no more than 3 turns of thread, then remove the thread.


Photo 9. Trim off the excess pheasant tail fibres to leave a small stub pointing rearwards to complete the fly.
Tying Tips
- There is a tendency for many large olive lures to be described as damsel nymphs, but damsel nymphs are slim and only about 2 – 3 cm long, so this pattern is an attempt at a closer representation of the natural.
- Damsel nymphs move sinuously in the water, so keep materials to a minimum – fine and sparse is the way to go.
- Use a fine thread to avoid an unsightly thread build up at the rear of the thorax.
- Tying the bead chain eyes below the shank helps to stop the fly from swimming upside down. Always ensure the eyes are square to the shank before applying the superglue.
- A slim marabou tail of a dozen or so fibres will maximize movement in the water.
- Keep all the tie in lengths of material the same length as the abdomen. This will avoid any unsightly lumps and bumps when the abdomen is wound.
- Use long marabou fibres with a good gradation in the length of the flue. This will not only help with manipulation of the marabou, but it will also produce a nicely tapered abdomen, particularly if the fibres can be kept straight and untwisted.
- For added security, the marabou fibres used for the abdomen can be wound over wet varnish or superglue and left to dry thoroughly before completing the rest of the fly.
- When creating the thorax, dub the marabou fibres onto the thread a little at a time, starting immediately behind the eye. I dub the head, between the eyes, and the thorax separately, so as not to compromise the bead chain eyes.
- Damsel nymphs tend to darken as they mature, so for spring fishing it is worthwhile having a few patterns tied with pale olive marabou.
Les Lockey – June ’22
The Yellow Owl (Emerger) – A Fly for June
Hook: Kamasan B160, short shank hook, size 12.
Thread: Pale yellow Textreme micro floss, 110 Denier, from FLYBOX.
Rib: Black tying thread.
Abdomen: Same as for thread.
Shuttlecock: 4 to 6 natural CDC feathers, depending on feather quality.
Thorax: Hare’s ear fur or fox squirrel body fur, dubbed.

Photo 1. Place the hook in the vice, catch on the floss behind the eye and wind it in touching turns to the thorax, then remove the tag end of floss.
Photo 2. Catch in the black thread rib and continue to wind the floss in touching turns to part way round the hook bend, binding down the rib as you go.


Photo 3. Using touching turns, wind the floss back to the thorax, then wind the black thread in open spirals up the abdomen to the thorax. Secure with floss and remove the excess thread rib.
Photo 4. Align the tips of the CDC feathers and with the tips forward of the eye and about the same length as the hook shank, tie them in. Trim off the waste CDC at a slight angle and bind down the ends securely with floss.


Photo 5. Dub the fur onto the floss and wind on the dubbing to form a small but spikey thorax.
Photo 6. Bring the floss in front of the CDC feathers, add a small drop of varnish or superglue to the floss and make a 3 turn whip finish though it then remove the floss to complete the fly.


Tying Tips
- Textreme micro floss is relatively strong, but being multistranded, it is easily frayed which weakens it considerably, so I use the floss in a smooth bobbin holder and try to remember to keep it well away from hook points.
- If you don’t want to use floss, then Uni 8/0 in Light Cahill or Textreme 8/0 in cream are decent alternatives.
- Use a lightly waxed, twisted black thread for the rib.
- Whenever possible, I prefer to obtain my dubbing fur directly from the hide of the animal. However, as only limited quantities of the short spikey fur can be harvested from a pair of hare’s ears, I usually use fox squirrel body fur as a more cost-effective alternative.
- Prior to dubbing the thorax, spin the bobbin holder clockwise to twist the floss tight, then with moistened fingers, apply the fur to the floss a little at a time – a tiny amount of fur is all you need – apply too much and it either falls off, or clumps together resulting in a very bulky thorax.
- After the fly has been tied, I brush the CDC feathers with liquid Mucilin Dry Fly Silicone and leave to dry thoroughly for 24 hours. Newly treated feathers take on a waterlogged appearance, but after drying, a gentle finger rub restores them to their natural state, ready for your fly box. Treated flies will float like corks even after catching numerous fish.
- Leave the CDC quite long to cope with windy conditions, but in calm conditions, don’t be afraid to trim the CDC to half its normal length.
Les Lockey – May ’22
The Summer Bibio (dry) – A Fly for May
Hook: Kamasan B170, medium wire hook, size 14.
Thread: Black Semperfli Nanosilk, 30 Denier, or any fine black thread.
Rib: Black tying thread.
Abdomen: Black Superfine dubbing, or similar fine dry fly dubbing.
Legs: Natural CDC feather, wound as a hackle.
Under Wing (Optional): 2 Strands of pearl Krinkle Mirror Flash.
Over Wing: 2 Strands of white Aero Dry Wing.
Thorax: Black Ice Dub, or similar.

Photo 1.Place the hook in the vice and catch on the thread behind the eye leaving a long thread tag. Now wind the thread in touching turns to opposite the barb. Do not cut off the thread tag as this will be used for the rib.
Photo 2.Lightly dub a thin noodle of Superfine dubbing onto the thread then wind it up the shank to form a slim tapered abdomen, stopping at the thorax. Now, use the thread tag to rib the abdomen in open spirals and tie it down at the thorax and remove the excess tag.


Photo 3.Tie in a small CDC feather by its tip using well waxed thread and remove any excess tip. Wind on one turn of the feather and secure it with thread before removing the excess feather.
Photo 4.Tie in 2 strands of Mirror Flash extending rearwards over the back of the fly.


Photo 5.Tie in 2 strands of Aero Dry Wing forward over the eye, ensuring the thread finishes immediately behind the eye.
Photo 6.Dub a small pinch of Ice Dub onto the thread and wind it rearwards forming a small ball shaped thorax, leaving the thread immediately in front of the CDC fibres.


Photo 7.Pull the Aero wing material back over the top of the thorax and tie it down with just one turn of well waxed thread. Add a drop of varnish or superglue to the thread and whip finish though it with only 2 turns of thread and cut off the thread.
Photo 8.Trim both the Mirror Flash and Aero Dry Wing to the hook length to complete the fly.


Tying Tips
- Fine threads such as Sheer 14/0 or Veevus 16/0 help to avoid an unsightly buildup of thread when finishing off behind the thorax. My preference is for 30 denier Semperfli Nanosilk, which is a very fine and unbelievably strong GSP (gel spun polyethylene) type of thread, but it does require regular waxing to stop it slipping.
- To help create an even thread base, hold the tag end of thread tight and at an angle of about 60 degrees to the hook shank, then wind the thread onto the tag just before the shank. In this way, the tag acts both as a stop, to prevent the thread from moving too far forward and as a guide, ensuring each thread turn naturally butts up against the previous turn.
- If the CDC legs are too long, a more natural result is produced by pinching off the excess with finger and thumb rather than cutting with scissors.
- I tie this fly both with and without the flash underwing, as sometimes the fish seem to prefer one over the other.
- To ensure the fly floats, brush it with liquid Mucilin Dry Fly Silicone and leave to dry thoroughly for 24 hours before transferring to your fly box.
Les Lockey – April ’22
Dennis the Menace Midge Pupa (Buzzer) – A Fly for April
Hook: Kamasan B160, short shank hook, size 12 to 16.
Thread: Black UTC 70.
Rib: Fine red wire.
Abdomen: Black UTC thread.
Wing buds/Cheeks: Medium holographic tinsel, red.
Thorax: Black UTC 70 thread.

Photo 1. Place the hook in the vice, catch on the thread behind the eye, wind it to the thorax position and remove the excess thread.
Photo 2. Catch in the wire rib underneath the hook shank and using touching turns of thread, bind it down to part way round the hook bend, returning the thread to the thorax position.


Photo 3. Wind the wire rib in open spirals up the abdomen and tie it in at the thorax. Continue to bind down the wire to the eye and worry off the excess wire.
Photo 4. Form the holographic tinsel into a loose loop behind the hook bend and secure the two ends underneath the thorax.


Photo 5. Wind the thread up and down the thorax area several times to produce a noticeable, but not bulbous thorax, leaving the thread at the head.
Photo 6. Bring the tinsel loop forward and over the top of the hook eye and secure it in place with tight turns of thread.


Photo 7. Take the thread in front of the tinsel and make 2 or 3 thread wraps rearwards trapping down the tinsel as you go. Now cut off the excess tinsel and continue to form the head, then whip finish and cut off the thread. Lightly coat the whole fly with UV resin and cure with a UV torch to complete the fly.
Tying Tips
- Early season buzzers are invariably small and black and are best represented using size 14 – 16 hooks.
- A flat thread helps to produce a slim, smooth body, but it can twist during winding. To counteract this, occasionally spin the bobbin holder anticlockwise until the thread becomes flat.
- When using UV resin, use it sparingly – a little goes a long way. Apply it using a fine brush or dubbing needle and always remove excess resin before curing with your torch. For more control, I apply and cure the resin in two stages – the thorax first, then the abdomen.
- Try changing the colour of the rib and wing buds to provide variety. A silver rib and orange wing buds or a pale blue rib and peacock green wing buds are good alternative options.
- As buzzers ascend the water column, they wiggle and are generally curved, but when they pause and fall back down the layers they lie straight, so tie up both curved and straight patterns to cover both scenarios.
Les Lockey – March ’22
A Privileged Happening
On a recent trip to Westlow Mere, I looked down and noticed what I thought were two Damsel Nymphs on the top of my bag. On closer inspection, I realised that one was the shuck and the other was actually the nymph. I kept putting my rod down, returning to see the progress of the nymph as it was going through the transition of growing the wings slowly out of the wing buds. I have read about this many times, but never actually witnessed it for real and I felt quite privileged. Below are a series of shots I took with my phone…..


Mike Warburton – Aug ’16
Some more tips from one of our members.
O.K. So we are idle, we buy in our ‘hand stripped quills’ from Venyards or some other commercial source. How many times have you been faced with one of these splitting or snapping just before you use it to make a ‘segmented’ body, and then having to back up about 2 or 3 processes, or scrap the whole thing and restart the fly from square one? Has anyone told you that these little things benefit from being stored in a solution of 75% water and 25% hair conditioner, or soaked in plain water before use – no, I thought not. Me neither. That is until I read it up in a chapter pertaining to just this subject in the “The Fly Tiers Bench Side Reference” by T. Leeson and J. Schollmeyer, not a cheap addition to your library I must admit, but if you take your fly tying seriously one I strongly recommend.
HEAD CEMENT
Now here is one I have to thank Louis Noble for, the use of a head cement called Fly Rite, it is extremely thin and requires at least two to three applications, and because of this it:
1. Soaks in quite quickly.
2. Requires a little patience.
But what you end up with is a fairly resilient head which has been well soaked and will last a few “attacks” from the teeth of that hungry trout.
WINGS
Next is a thank you for Wendy Gibson. Knowing I had arthritis she pointed out the fact that as we get older the thumb and forefinger no longer ‘pinch’ together the same. Let me try to explain – in our ‘youth’ our thumb and fore finger pinches together with the finger nails more or less in the same plane, as you get older you have to pinch on progressive fingers to maintain the same situation. At 75 years old and with the arthritis creeping into my knuckles, to do a “pinch and loop” I am using my thumb and the finger next to my little finger (my ring finger), using my thumb and index finger results in my thumb nail being at right angles to my index finger nail leading to a natural tendency to put a twist into the wings.
For those of you who are new to the ‘game’ you will find several things are true concerning this pastime.
1. It can become obsessive
2. You will end up with far more tools than you will ever need (you only have two hands).
3. Eventually you will also find you have more capes, wings, feathers and materials in general than you have space for (and the missus will be the first to say “what is that smell”)?
Don’t get down hearted, you are not alone we are all in the same boat. My gear and reference books have taken over the whole of what used to be called the “box room”, it even has a tying bench stretching the length of the room made up of a piece of kitchen work top 3 Metres long, sat on top of 4 four drawer kitchen units.
Finally, a piece of advice, come along to your local Fly Dressers Guild meeting, you will find that there are people like yourselves, maybe not wanting to get into fly dressing any further than to tie their own flies and believe me there is no more satisfaction to be gained than that of catching on a fly that you have tried yourself.
Take care, and tight lines to you all
Ni the Fly
Ni Rogers – Aug ’16
A Trip to Brenig
The top tip for this month is to get to Brenig before the 1st of August. The team there have been having back problems, as new stock (average weight 11/2lbs) are due on the above date. Trouble is their old stock has got too big! Minimum stock size until then is 3lb and so causing some weightlifting problems. I visited the venue on Tuesday 5th July and did make the odd mistake. Firstly, I turned up on motorcycle. Next, I came with all the bits to fish boat with, such as a boat net, a drogue, several reels but only one travel rod and a lot of flies!


Not a problem, as long as you do not catch a lot of larger fish – it’s a room issue on a bike. I had a rucksack for most bits, but due to not booking a boat in advance, I needed to pack waders and several layers of clothes. The saddle bags catered for all these things with just enough room for a few fish.
The bag limit is six fish. I did take several thick plastic bags, just in case, so I could put a few fish in these, then in the saddle bags. Unfortunately, I did not plan for the odd large fish or even several big fish. I kept the 3 smallest fish of 7 fish caught (2 x 3lb and 1 x 4lb) I had to release the others up to 6lb+!
This was my first visit to Brenig in over 10 years, so had it changed? No not really, the fish still were in the same places, just bigger. Was I just lucky? No, as I returned to the “Centre” two bank angles were just packing up at 14:30hrs. They had both “bagged up” with 6 fish weighing 22lb in total each. When setting up and waiting for “Boat” time to start, I met up with a chap I used to shoot with and he and his boat partner were on their first visit to the venue. About 11am we met up on the lake, where I explained that I was having to return fish. At that point they were not doing well and had not managed to land a fish. I showed them what I was using – a slime line with one white lure fished 2’ – 4’ down. They accepted a few flies and moved to the next bay. 30 minutes later they called back to thank me as they had both caught several fish including a best of 6lb+.
When packing up I spoke to the guy in charge of stocking, who was happy to see the larger fish coming out. He explained that it was always difficult to please all, but the odd thing is, by accident I had stumbled on a successful way to catch these fish. In August when the new stock is put in, most will be caught on the top with dries or “damp” patterns, whereas these larger fish tend to feed lower in the water.


Why did I start with the slime line? As I was in a boat by myself and there was a good wind blowing it can be difficult to cast a dry line out and keep in contact, without stopping a large bow forming. I could have put out a drogue, but then again it can cause more problems for a single occupant, getting up and down.


The centre, by 14:30, with a bit of a wave plus the end of the “Arm” – no white horses, but still, a bit bumpy
Will I return? too right. I just need a day off from chauffeuring duties before the 1st August!
Eddie Wilkinson – July ’16
Casting for Recovery at Coniston Hotel and Country Estate.

On April 17th 2016 Bernie Ratcliffe and Mike Warburton, as part of GAIA, were both honoured to have been invited to take part in a special day for the charity, ‘Casting for Recovery’.
An amazing venue and amazing cause. A large group of ladies, all recovering from Breast Cancer, were entertained for a two-day event at the Coniston Hotel by GAIA and C.f.R.
On the second day each lady was paired up with a chap from the GAIA group. Quite a surprise for the ladies, as they had not been told about this arrangement. They were all kitted out with the correct gear, compliments of Orvis, and were quite excited about the prospect of spending the day with a personal mentor, fishing and having fun.

The day went fabulously well and everybody had a great time. Lunch was provided, followed later by a superb buffet for all. Speeches and presentations were made, with a certificate for every person who took part in the day.


Coniston Hall did a superb job of the entertaining and even supplied a glass of pink Champagne to welcome everybody to the buffet.
What a day! So rewarding for everybody involved and the venue…wow, stunning to say the least. Not many fish were caught, due to extremely hot weather and high pressure and …….
The event was run and organised by Vee & Bob Carlson, two lovely dedicated people, who put in an immense amount of work to make it happen.
Mike Warburton
